
Tuesday, June 4, 2013
Monday, June 3, 2013
St. Louis, MO
St. Louis:
ADM Milling


Luther Yard -- Built in 1890 by the Wabash Railroad as a classification yard. Currently the yard has an average of 63 trains per week.


Intermodal Yard

Norfolk Southern Mechanical Operations Building
Turntable


Interchange with BNSF
ADM Milling

Henkel
Henkel - Adhesives, Sealants, Laundry, Home Care, Beauty Care (Dial, Purex, Right Guard, Schwarzkopf, Softscrub, and Loctite - covered hoppers and tank cars


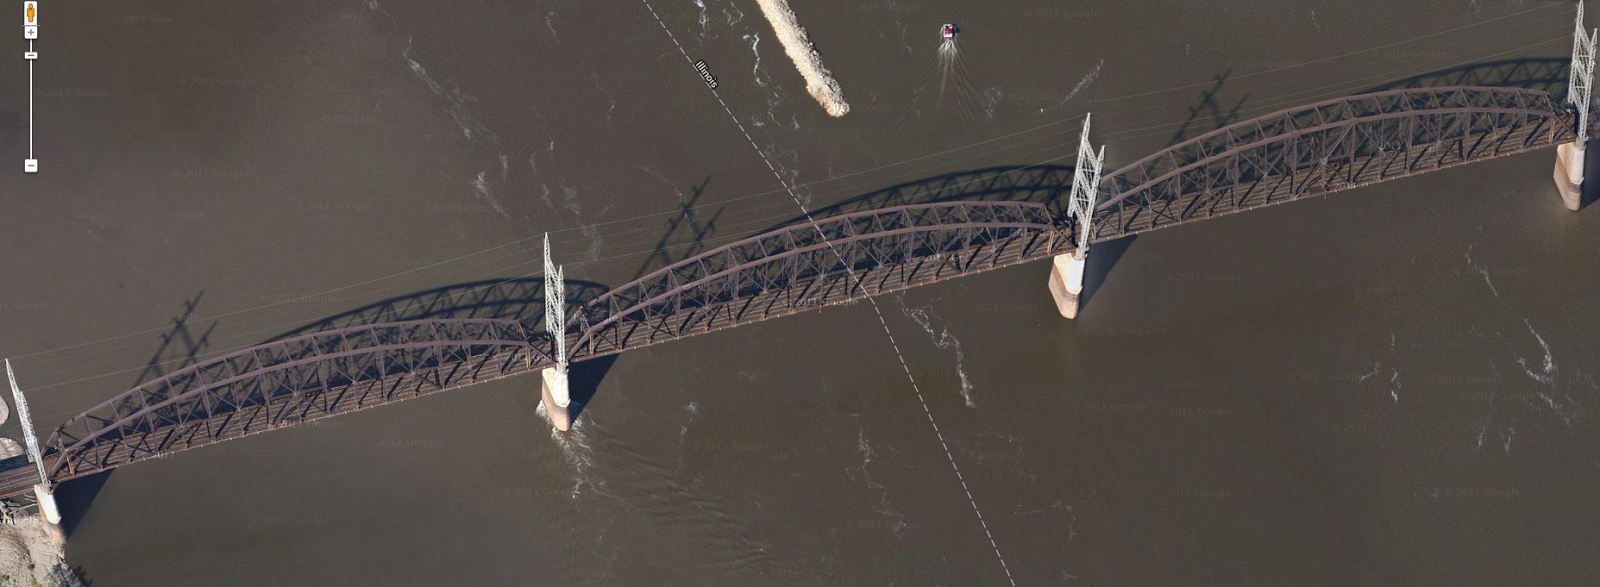
Mississippi River Crossing - Merchants Bridge
Saturday, June 1, 2013
LED Layout Lighting
It started with a discussion between my father and myself three years ago about whether or not it would be possible to use led lighting to light a layout efficiently. Through much experimentation with led options from suppliers I have worked with in the past for other projects, we finally found a solution that is effective for lighting they layout and remaining cost effective.
What we obtained was many 5 meter rolls of a Flexible SMD LED Tape with 5050 SMD LEDS on it in a daylight white. There are many colors available and multiple color temperatures of white, we settled on the day light vs two other color temperatures because the others were more yellow or blue than we liked for the layout look. SMD LEDs are also available in 3528s instead of the 5050, but only provide about 1/3 as many lumens, although the 3528 tape is going to work very well inside some of the buildings.


To install the LED Lighting I ran a 12v bus line around the top of the layout. Now that I had the 12v power throughout the layout I began to plan how I would cut the LED tape to best cover the entire layout. We decided that only applying the tape in straight lines vs attempting to follow the curves of the layout was the most effective way. We attached an 1/8" masonite hardboard stip to the framing for the upper level of the layout and applied the LED tape directly to the smooth side of the masonite.
What we obtained was many 5 meter rolls of a Flexible SMD LED Tape with 5050 SMD LEDS on it in a daylight white. There are many colors available and multiple color temperatures of white, we settled on the day light vs two other color temperatures because the others were more yellow or blue than we liked for the layout look. SMD LEDs are also available in 3528s instead of the 5050, but only provide about 1/3 as many lumens, although the 3528 tape is going to work very well inside some of the buildings.


We applied a stip of the LEDs about 2" from the front of the layout and then a second strip about 6 inches from the back of the layout to give us the best coverage thoughout. In some of the deeper areas of the layout we added a third strip in the middle. In one of the pictures you can see another strip of the LEDs applied to the back side of the facia, These are an RGB version of the 5050 SMD LEDs that we have been experimenting with to add color differences to our backdrop to represent different times of day. We are very happy with our current results and the LEDs have been installed now for almost 3 months with out any issues.


There are a few major benefits to LED lighting that led us to start experimenting with options;
Power - we are able to light our entire layout while only using less than 10 amps
Heat - while the traditional method of lighting for a layout has always been incandescent or fluorescent lighting, both methods produce a great deal of heat. After hours of operation with the LEDs on at full, they are still cool to the touch, making it great for a room that has multiple bodies in it already to operate the layout. We're happy to have to run the airconditioner a little less to keep the room comfortable.
Installation - installation was a breeze, we managed to put up lighting on the entire lower level in less that an hour. The 12v power supply for the LEDs lives near our DCC command station and has 16g bus wires that run up behind the backdrop and around the layout. To attach each strip of LED lights, I simply soldered on a couple feeder wire to the (+) and (-) pads on the strip itself and then use 3M "suitcase" connectors to attach them to the bus wires.


Friday, May 31, 2013
NS Locomotives
With Norfolk Southern selected as my railroad of choice for this model, it became time to review what locomotives I currently own vs what I need to own. I currently own nearly 30 modern Union Pacific locomotives of which I will need none. I have decided to keep a few of them though because I have the entire UP Heritage Series locos, and I can use them as visiting locomotive on NS lines.
When I began looking for modern NS locos, I quickly realized that there would be a need to decorate my own. NSDash9 website is a awesome source for past and current roster of locomotive used by Norfolk Southern. With the help of this site, I quickly established a list of currently available undecorated locomotives and decals from ShellScale that would enable me to start building my modern fleet.
This is my first batch of undecorated locos to make the transformation to NS locomotives for my future layout.


I failed to take any pictures as the process really progressed but once they were all clean and had been given time to dry, they received two coats of engine black to all the parts. One thing I can say for NS engines, they are not difficult to paint. I let the black paint sit over night and applied a coat of clear gloss in the morning to provide the best surface for the decals to adhere to.


Here are the two locomotives with at least the decals finished, but I still need to go back and do a bit of paint work now.


Thursday, May 30, 2013
Missouri River Bottoms
Missouri River Crossing into Missouri River Bottoms (Earth City)
Wabash Bridge
This bridge was built in 1936 and replaced an early bridge of the same name. This bridge is currently used by Norfolk Southern to cross the Missouri River near St. Charles on the west and Earth City, MO on the east.

While the prototype crosses the river with city on both sides, on my model I will be crossing from rural on one side of the river to the Earth City Missouri River Bottoms area on the other.
Missouri River Bottoms Industrial Area
Georgia Pacific Corp - Im not sure what this facility of Georgia pacific is specifically used for, but seems to have loads of dimensional lumber about the yard and in sheds, dimensional lumber would be delivered via a center beam car. Also, I have to assume that the large warehouse is for sheet material that would be delivered in boxcars and unloaded indoors.


Foam Supplies - I've started to do a little research on the company but really it just continues to say that provide polyurethane systems. After a bit of research I am surprised to discover how many things are made of polyurethane, the list goes on and on, but for my purposes, Foam Supplies gets liquids in via tank car and appears to ship out via truck.

Also many large warehouses are served by rail:


This is a nice thing on the prototype that would make a very nice element on a model railroad. Very short rail tunnel under the road. I guess in this instance, building a concrete tunnel was probably more economical.

Wednesday, May 29, 2013
NS Coal Hoppers
When finally deciding on the Norfolk Southern as my railroad of choice, I quickly noticed the lack of both rolling stock and locomotives compared to other railroads, especially compared to the model I had been working on. While my father planned on running it during the transition from Missouri Pacific to Union Pacific, I had been purchasing rolling stock and locomotives to run it in a more modern era.
Since I am devoting a good portion of my future layout to a coal branch, the first priority of rolling stock has been coal hoppers. I have acquired many of the modern RD-4 Hoppers from Fox Valley Models with private power company names (Alabama Power, Alliant Energy, Union Electric...) but I wanted some NS lettered coal hoppers as well. While I did find a few NS coal hoppers available from Atlas, I wasn't overly impressed with them, so I started the process of making my own. The 3-Bay 100-ton hopper from Micro-Trains was going to be my undecorated of choice and after an email Midwest Model Railroad (a shameless plug for a company run by a friend, if they don't have it in stock they always get it for me), I now have 12 of them on my shelf at home. After a little research, the best choice for NS decals seems to be Shell Scale Decals.
Creating the NS Coal hopper
I failed to take any pictures of the Micro-Trains hoppers before I put any paint on them and now I am back out on the road so I don't have the opportunity to take a picture of one of the other 10 that I have not done yet. The Micro-Trains undecorated rolling stock is excellent to work with. The only thing I had to attach was the brake wheel and trucks.
1. Cleaning - Before doing anything with the model it is a great idea to wash it. I use a tooth brush to remove any oils that has been left on the hopper from the factory, or myself handling it before I put on the gloves.
Once the hoppers had been cleaned, I made sure to not touch them anymore without wearing gloves.
2. Painting - Micro-Trains undecorated cars always seem to vary what color they might show up in, so depending on what that color is will affect your choice in priming and painting. My hoppers were molded in black and I choose to spray with Engine Black. I have a portable small airbrush booth that I set up on my workbench and do my painting inside. Here are the two hoppers after a single coat of engine black.

Applying the decals was a longer than expected tedious process. There are a few errors, slips of the knife, edges of other stuff that have snuck in to parts of the deals that I am not perfectly satisfied with, but for a first attempt at doing these tiny numbers in N-Scale, I'm happy with the result.
Micro-Set and Micro-Sol should become your best friends! The are very simple to use, apply Micro-Set to the area of the model where you apply the decal, and then Micro-Sol with go on afterwards to soften the decal and get it to form closer around detail elements, or ribs in the side of the car.


Also, because this is not the exact hopper that the decals are for, there wasn't enough space for all of the lettering on the end of the car that should have been applied. I ended up keeping all of the decals on the end and left of the cars road number. I have good eyes and it was difficult for me to read, so im not to concerned about it.

Since I am devoting a good portion of my future layout to a coal branch, the first priority of rolling stock has been coal hoppers. I have acquired many of the modern RD-4 Hoppers from Fox Valley Models with private power company names (Alabama Power, Alliant Energy, Union Electric...) but I wanted some NS lettered coal hoppers as well. While I did find a few NS coal hoppers available from Atlas, I wasn't overly impressed with them, so I started the process of making my own. The 3-Bay 100-ton hopper from Micro-Trains was going to be my undecorated of choice and after an email Midwest Model Railroad (a shameless plug for a company run by a friend, if they don't have it in stock they always get it for me), I now have 12 of them on my shelf at home. After a little research, the best choice for NS decals seems to be Shell Scale Decals.
Creating the NS Coal hopper
I failed to take any pictures of the Micro-Trains hoppers before I put any paint on them and now I am back out on the road so I don't have the opportunity to take a picture of one of the other 10 that I have not done yet. The Micro-Trains undecorated rolling stock is excellent to work with. The only thing I had to attach was the brake wheel and trucks.
1. Cleaning - Before doing anything with the model it is a great idea to wash it. I use a tooth brush to remove any oils that has been left on the hopper from the factory, or myself handling it before I put on the gloves.
Once the hoppers had been cleaned, I made sure to not touch them anymore without wearing gloves.
2. Painting - Micro-Trains undecorated cars always seem to vary what color they might show up in, so depending on what that color is will affect your choice in priming and painting. My hoppers were molded in black and I choose to spray with Engine Black. I have a portable small airbrush booth that I set up on my workbench and do my painting inside. Here are the two hoppers after a single coat of engine black.

Before applying any decals, the hoppers needed to be sprayed with a gloss coat for the decals to adhere correctly. I don't remember what type of gloss coat I use but they are available from many different sources.
3. Decals - I would now suggest never starting a decal project like this late at night...
For some reason I began this project late in the evening, and once I started I didn't want to stop till I was done, about two in the morning I finally put down the knife and tweezers and called it good.
Micro-Set and Micro-Sol should become your best friends! The are very simple to use, apply Micro-Set to the area of the model where you apply the decal, and then Micro-Sol with go on afterwards to soften the decal and get it to form closer around detail elements, or ribs in the side of the car.


Also, because this is not the exact hopper that the decals are for, there wasn't enough space for all of the lettering on the end of the car that should have been applied. I ended up keeping all of the decals on the end and left of the cars road number. I have good eyes and it was difficult for me to read, so im not to concerned about it.

4. Dullcote or Matte Finish - Once all of the decals have been applied it is time to seal them. I use a Krylon matte finish vs Dullcote because for the same price I get a standard size can, and it seems to work just as well.
5. Finishing the Hopper - Once everything had been sealed I went ahead and swapped out the plastic wheelsets that came with the hopper for 36" metal wheelsets from Fox Valley Models and install the trucks.
Tuesday, May 28, 2013
SD40-2 GATX
SD40-2 GATX
This project started almost a year ago, but because of my schedule it is still not entirely completed. While I have been working on a few other undecorated projects I decided to revisit the orphaned loco and get it a little bit closer to completion. It has received its road number and a GATX lettering under both windows on the cab. Also I have finally done though and added the fine yellow stripe across the side of the platform.

This project started almost a year ago, but because of my schedule it is still not entirely completed. While I have been working on a few other undecorated projects I decided to revisit the orphaned loco and get it a little bit closer to completion. It has received its road number and a GATX lettering under both windows on the cab. Also I have finally done though and added the fine yellow stripe across the side of the platform.

Here are the links to the original posts about this loco almost a year ago.
Subscribe to:
Comments (Atom)